The Best Digital Backs

Phase One IQ4 150 digital back, front and back views.
There is no argument that Phase One makes the best digital backs. I have been shooting with a PhaseOne IQ4 150 150MP digital back since the middle of 2019.
Prior to this, I used a PhaseOne IQ3 100 100MP digital back for a few years.
I also used an IQ3 100T for about 6 months. All of them are top-of-the-line equipment, offering the highest image quality.
However, I do feel that IQ4 150 is a much better DB.
The resolution improvement over 100MP is evident in fine-detailed areas, however not by a big margin.
The real advantages of the new system come in other aspects of the workflow.
The Backside Illumination Sensor (BSI) sensor mostly eliminates the need for LCC on the field.
LCC refers to Lens Cast Calibration. The rear elements of technical camera lenses are very close to the sensor surface.
As a result, when shooting with a wide-angle lens, light at the edges of the image comes from a very sharp angle, hitting the sidewalls of the sensor wells instead of the sensor photocell. The result is very strong color casts called lens cast, in the forms of red/purple/magenta colors, near the edge of an image. Many lenses also show vignetting.

Image taken with a HR 23mm lens on IQ3 100. The edges show very strong color casts (red-shift) and vignetting.
To correct color casts and vignetting, traditionally, photographers must cover the lens with a piece of semi-transparent white plastic, and take a calibration image (LCC file). The center of the image should be white or gray. The edges show color casts and vignetting.

LCC files of HR 23mm lens on IQ4 150 (left) and IQ3 100 (right). On IQ3 100, the lens shows horrible color cast and vignetting.
On IQ4 150, the color cast is mostly gone, leaving only vignetting, which is easy to remove in post, with or without an LCC file.
Software such as Capture One will use data in the LCC file to "subtract" color casts and vignetting from the original image. Since color casts and vignetting change after shift and tilt movements, one is supposed to do an LCC shot immediately before or after every movement.
Let's say you are shooting a panorama. You shift to the left, take a shot. Then you need to increase the exposure time (covering the lens with the white plastic board will cut incoming light by about 2 stops) and take the LCC shot. You then shift to the right, shoot, and take another LCC image.
Everyone hates doing so, and rightfully. Even with an LCC file, for certain lenses such as the HR 23mm,
it’s not possible to completely remove the reddish colors. One has to spend a long time in post to manually remove them.
In fact, I often wondered why we could tolerate such a ridiculous limitation on such an expensive system for so long.
Thankfully, with the IQ4 150, we can skip this step most of the time.
Color casts (caused by sensors) are mostly a thing of the past. Vignetting, a property of lenses, remains.
However, it can be removed in the post by brightening the dark area. If you shoot an LCC file (I still do if I have time),
you can do a better job of completely removing the vignetting, but it is not absolutely necessary anymore.
In fact, some form of vignetting can be a good thing, forcing the eyes to the center of the image. I often add some if there was none from the original.
Also, on the IQ3 100, when you take a slightly longer exposure, or change the exposure setting,
the digital back wants to take a Dark Frame, which is used internally by the digital back to get rid of dark current noise.
To take a dark frame, you must cover the lens cap or close the shutter lever on the lens, using the exact same exposure combination to take a shot.
If your previous exposure is 1 minute or 60 minutes, the dark frame will take the same amount of time.
You are certainly going to miss some shots during the rapid-changing sunset/sunrise time.
Moreover, if you forget to close the shutter level when taking the dark frame (we all have done this),
some really, really horrible images will pop up on screen. Do not worry too much, though.
Turn off the digital back and turn it back on, and your nightmare will be gone.
On the IQ4 150, you can choose to turn off dark frames.
The system will use some internal algorithms or pre-recorded dark frames to do noise reduction.
In fact, if your exposure time is less than a few minutes, you probably will not see much noise difference when turning off dark frames.
This is a huge improvement. Of course, if you do really long exposure such as 30-60 minutes,
then dark frames are still essential to get very clean images.
The only thing that IQ4 150 shares with its predecessors is the same physical dimensions and appearance of the case.
The internal design — from hardware to software — was designed completely from scratch.
They adopted Linux instead of keeping their proprietary operating system, which was increasingly more difficult to maintain for such a small company.
As a result, Phase One cannot simply "port" old features to the new platform.
They have to re-implement them, which takes time. Some of the features which are available in the old platforms are still missing, as of this writing.
On the other hand, the much more powerful new Infinite platform (with at least 10X faster computing power) enables many new useful features such as Frame-Averaging and DualExposure+. We fully expect that more will come. The two features I mentioned are extremely useful for landscape photography. Frame-Averaging performs in-camera frame-averaging to emulate long exposure, reduce noise, and significantly improve dynamic range. The result is a single RAW file. While you can manually shoot many (tens to thousands) RAW files and do frame average in Photoshop (what I’ve been doing for years), it will take much longer and much more memory card space to do so.
DualExposure+ very smartly utilizes the electronic shutter to take two images, 3-stops apart,
almost simultaneously, and stores both exposures inside a single IIQ file.
Capture One will then automatically exposure-blend the two together.
This will significantly expand the already very-high dynamic range of IQ4 150.
Some people think this is just a gimmick.
They say that it is easy to do so manually by taking two different exposures manually and blend them together.
The reality is that if you take two exposures manually, there will be a delay between the two,
and it will be difficult to blend if there are moving objects (tree leaves in the wind, etc.).
The built-in DualExposure+ takes the two exposure very closely together, so moving objects are mostly not a concern.
Finally, if you plan to use a PhaseOne XT camera, you have to use the IQ4 150, as many automatic features,
such as controlling the electromagnetic shutter in the lens, are power-shared and controlled by IQ4 150.
Previous generations of digital backs cannot do so.

The Best Technical Cameras
This list is not meant to be exhaust, as there are many great products on the market. I am discussing four technical cameras that I own or have used extensively. They are among the best of the best systems for landscape photography.
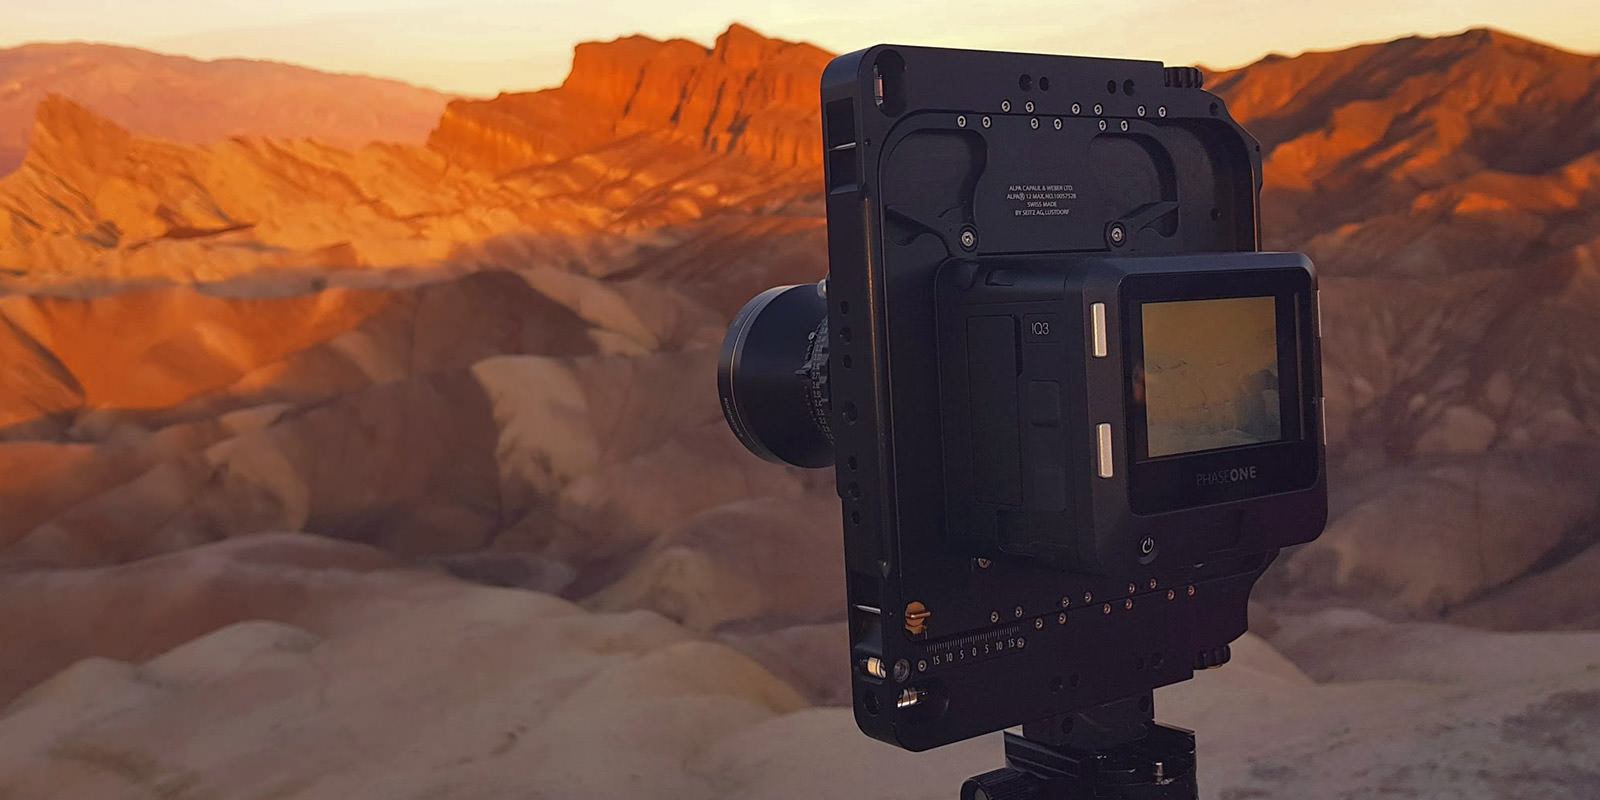
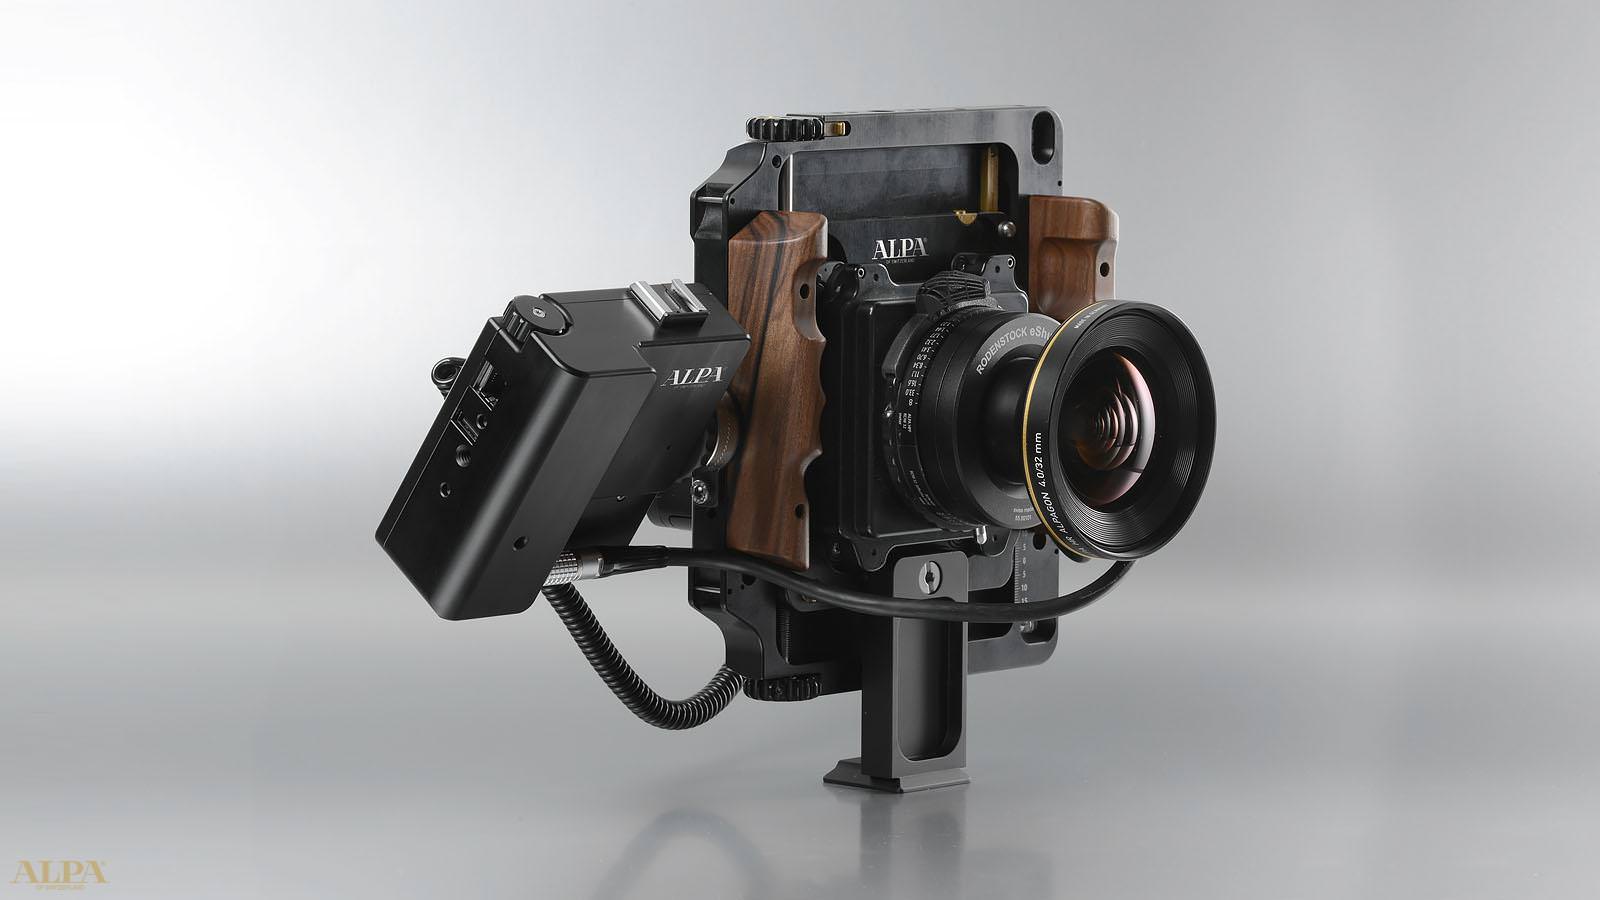
I am a big fan of ALPA camera systems. Their long-term precision and durability are legendary. Their elegant simplicity is second to none. It may take you weeks or even months to get used to the workflow of shooting with an ALPA. However, once you are comfortable with the technical movements, you can shoot very fast, even in the middle of night. I have used my ALPA systems to shoot many amazing starscapes, and most of the time I can do so much faster than my friends shooting with 35mm cameras.

ALPA 12 STC (20.8 oz / 590 grams)

This is my workhorse. It is compact, lightweight, and versatile. I always take it with me when going on long and difficult backcountry hikes. It has a 36mm (+/- 18mm) shifting capability, geared or sliding. It shifts vertically OR horizontally, but not at the same time. This is a price to pay for being small and lightweight. Since I only use 12 STC for landscape work (don't have many buildings in my images so distortion is not a major concern), I mostly use horizontal shift movement for panorama stitching. The camera is small enough to fit into my 50L F-stop backpack with a large ICU, with four HR lenses.
With 36mm shifting, I can create panorama images at the aspect ratio of 1:2.25, which I find very pleasing to the eye. Of course to do so, you need lenses with very large image circles – HR 90 and HR 180 are two examples.
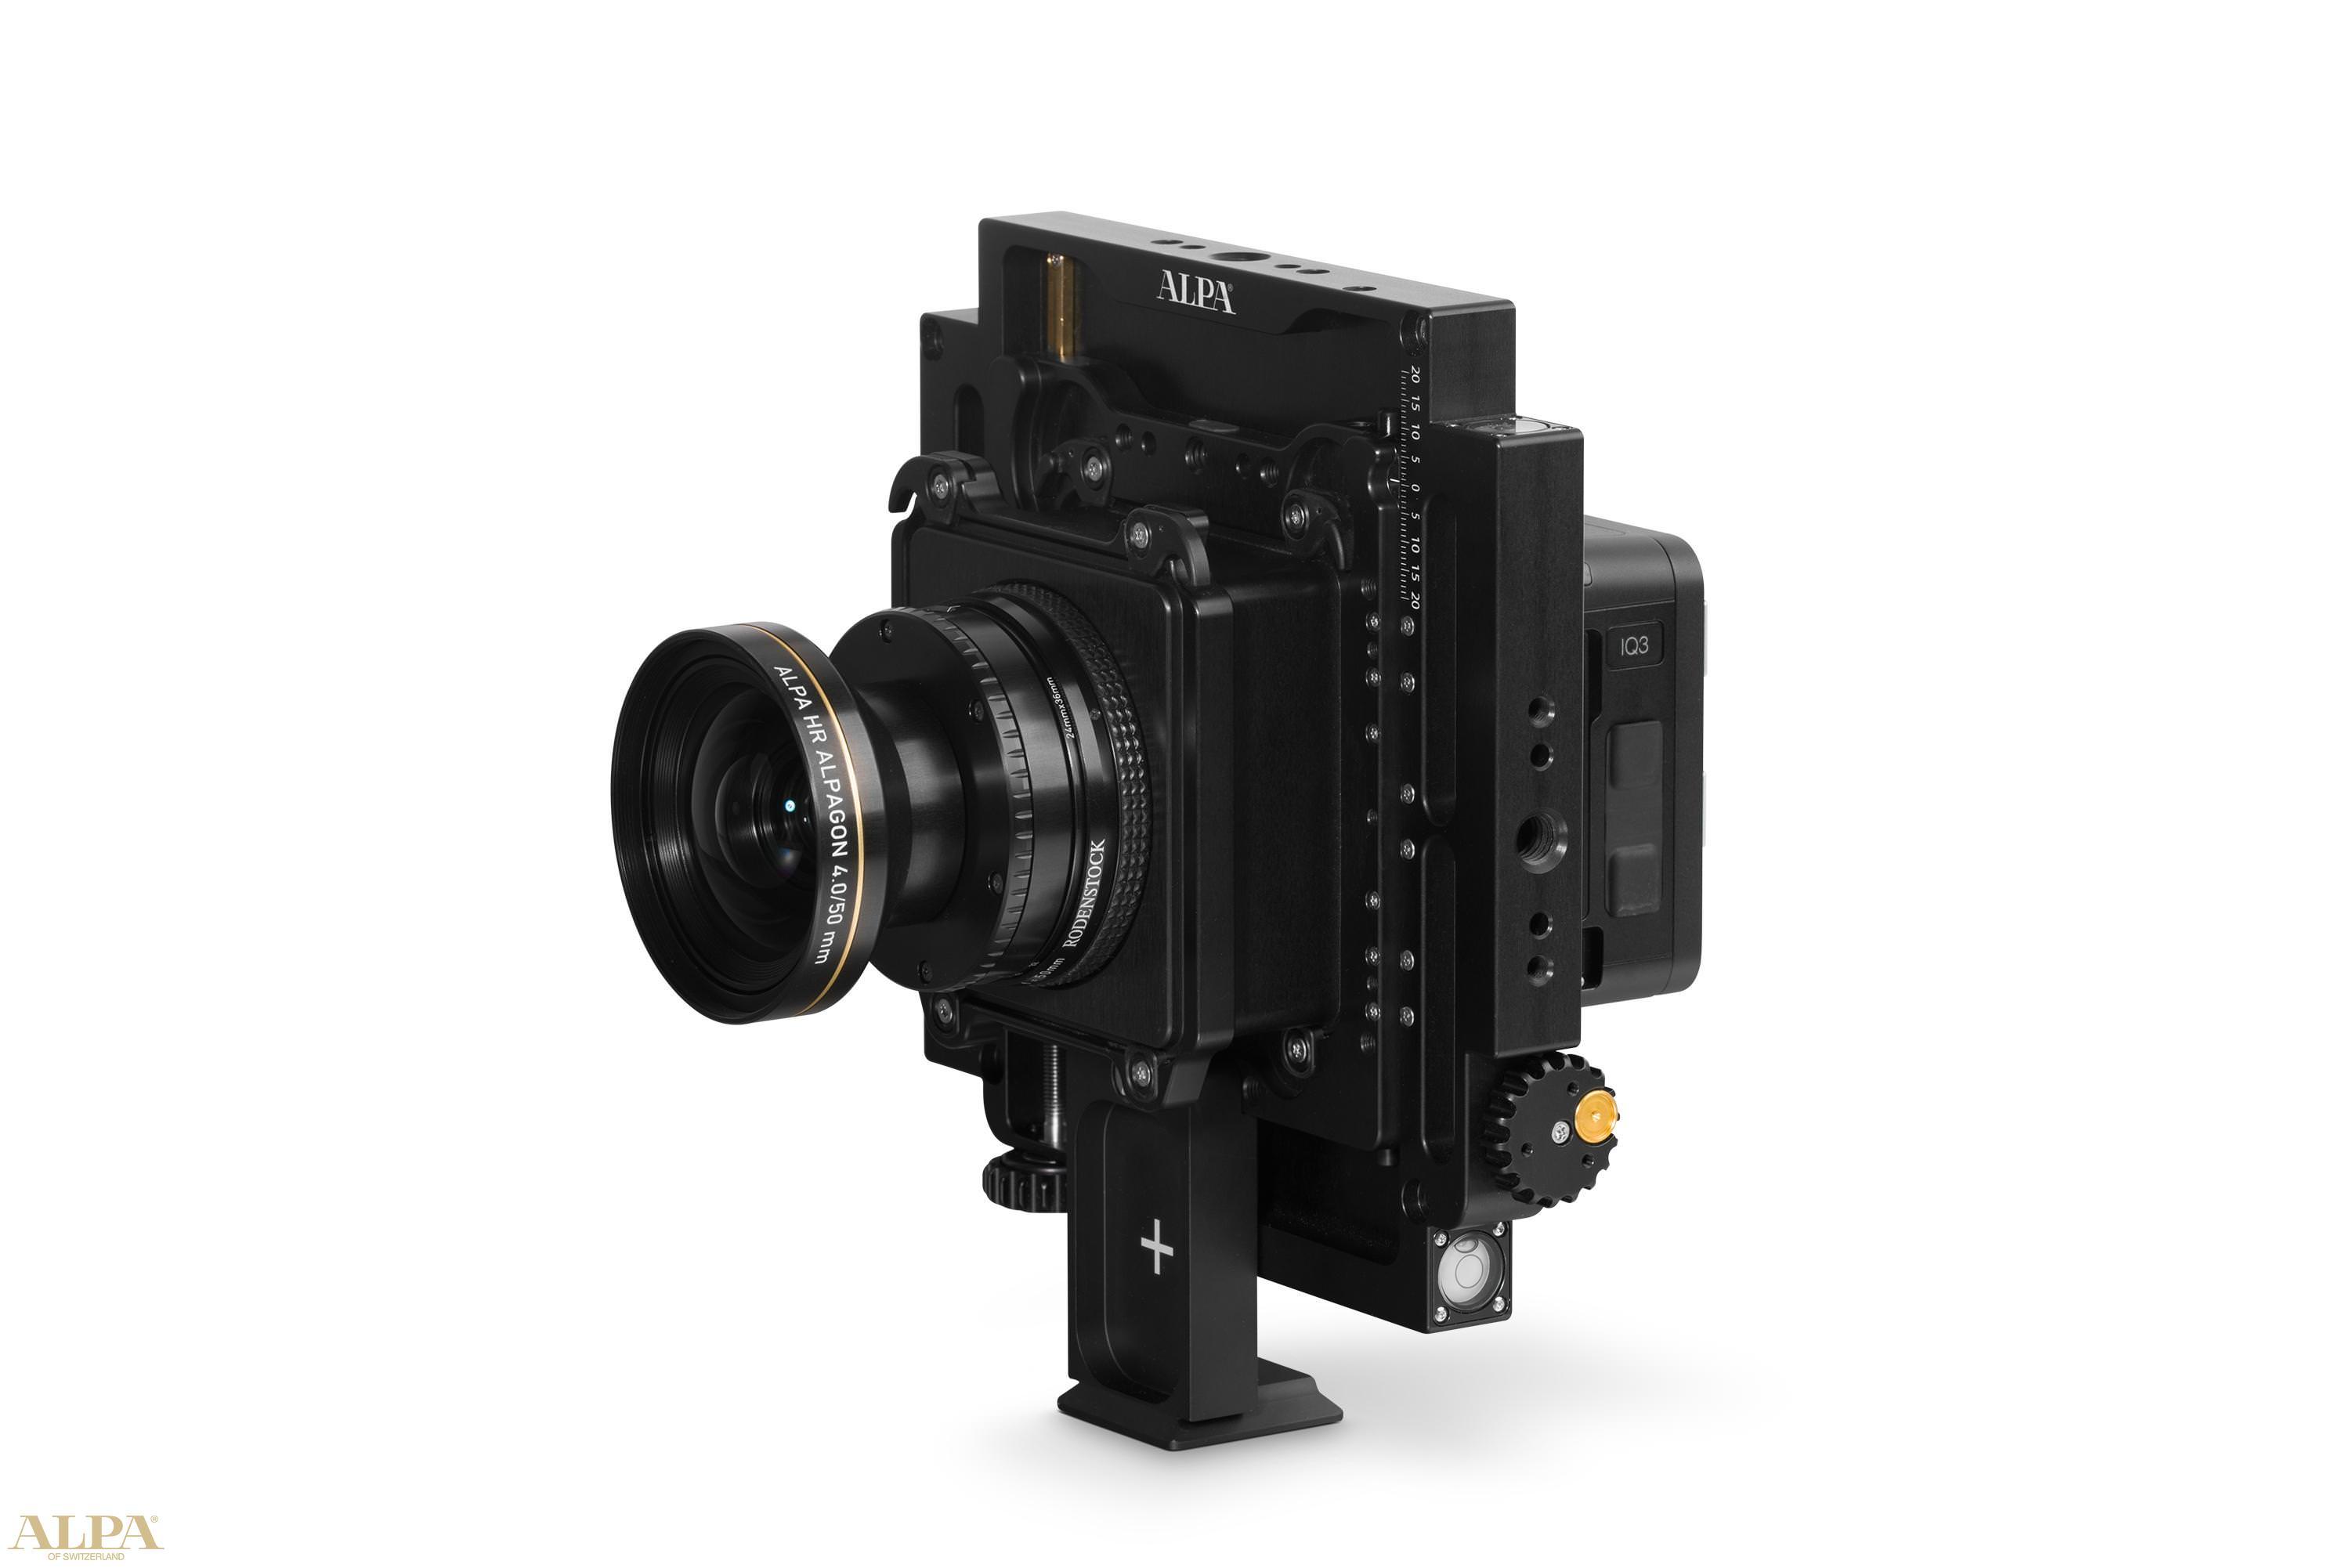
ALPA 12 MAX (42.3 oz / 1200 grams)
The big brother of 12 STC, 12 MAX is heavy and bulky. However, it offers capabilities of vertical shift of 43mm (+25 mm/ -18 mm) AND horizontal shift of 36 mm (+18 mm, -18 mm). Only the Y-axes movement is geared. The X-axes movement is slided - which I actually like, because I can do very fast stitching.
For landscape work you probably will never have to shift 25mm vertically - it is clearly a feature designed for architecture photography. However, you can turn the camera 90 degrees, and now suddenly you have a camera that shifts 43mm horizontally and creates panorama images at 1:2.425 aspect ratio, which is also lovely. The four-way shifting capability allows me to avoid perspective distortion AND create panorama stitching at the same time.
I am often hesitant to carry it when going on multi-day hikes. However, when shooting in locations such as Lofoten Islands where I need to worry about correcting perspective distortion of buildings, this machine is a must. Also, when I don't have to hike long distance, I am happy to have it in my camera bag.
ALPA 12 PLUS (36 oz / 1025 grams)
The new 12 PLUS is slightly lighter and smaller than 12 MAX. It shifts in all directions (horizontally AND vertically) by +/- 20mm.
The biggest changes is that BOTH the X-axis and Y-axis movements are geared, offering extremely precise control, similar to the much bigger (and discontinued) ALPA 12 XY.
Like other models, with the flip of a switch, you can disengage the gears and slide the lens or the back very fast. You can order it with pre-set detents (e.g., every 5mm), so you know when to stop sliding even in darkness. Another improvement is the addition of cushioning bumpers at the ends of sliders. When you slide the lens or the digital back, you will not bump the frame and hear the heart-wrenching sound any more.
If you are a landscape photography debating between a 12 PLUS and a 12 MAX, you should probably go with 12 PLUS. You will be happy with the slightly smaller body and the new features mentioned above.
ALPA Accessories
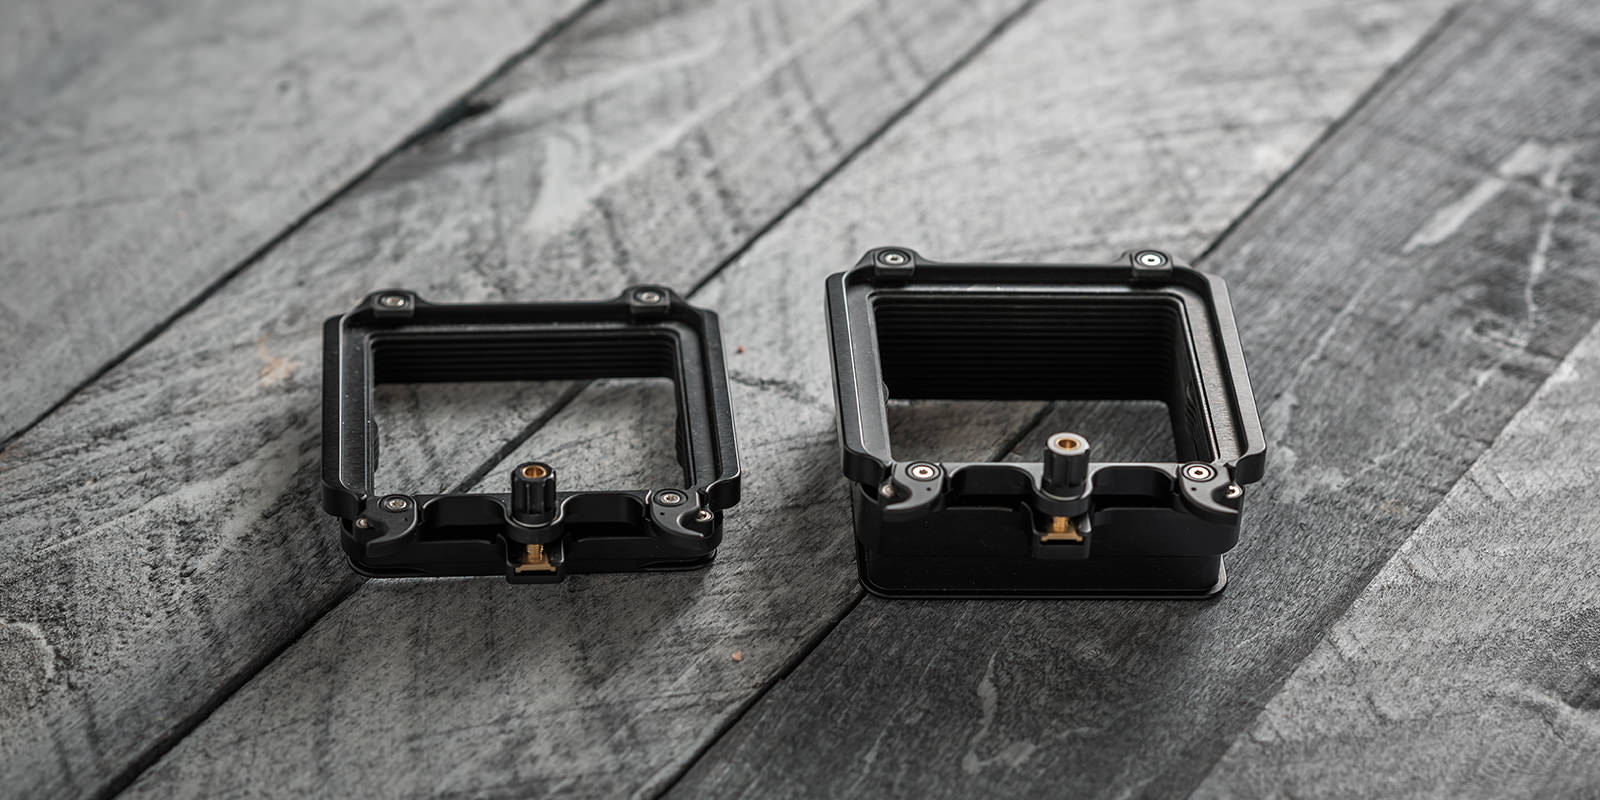
Left: ALPA 17mm Tilt Adaptor; Right: ALPA 34mm Tilt Adaptor.
Most of the ALPA lenses come in the Short Barrel (SB) format. For example, a lens with “SB 34” in its name means that the lens barrel was shortened by 34mm. Similarly, SB 17 means that the lens barrel was shortened by 17mm. When mounting the lens on the camera, it is necessary to add an extension tube of 34mm or 17mm, respectively, between the lens and the sensor to maintain the original, correct image distance (the distance from the sensor to the optical center of lens). Without them, the SB lenses will not focus correctly. If the lens is in the Long Barrel (LB) format, then the extension tube is not needed. Note a few lenses (e.g., HR 40) come with both SB and LB versions. There is a lens (HR180) that comes with two different SB versions: SB 34 and SB 51.
The original design decision of using such extension tubes was to reduce the mechanical vignetting caused by the camera body. For some lenses, when the sensor on the back of the camera is shifted to the extreme side, the camera body (the edge of the opening window) shades a part of the sensor, causing vignetting. This type of vignetting is different from the inherent vignetting (the image circle) of the lens itself. This is an artificial vignetting caused by the camera body at a certain position.
ALPA shortened the lens barrel and installed an extension tube between the sensor and the camera body, so the image distance remains the same. However, the sensor is now much further back from the opening of the camera body. The shadowing is significantly reduced, allowing the optimal usage of the full image circle.
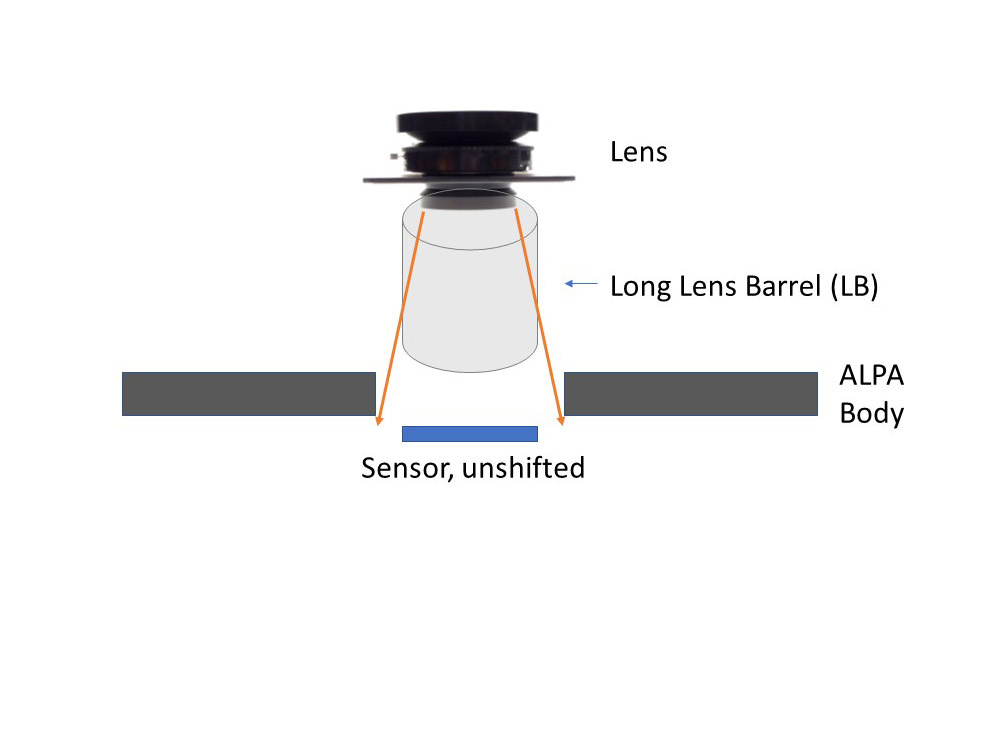
With a LB lens, when sensor is not shifted, there is no vignetting.
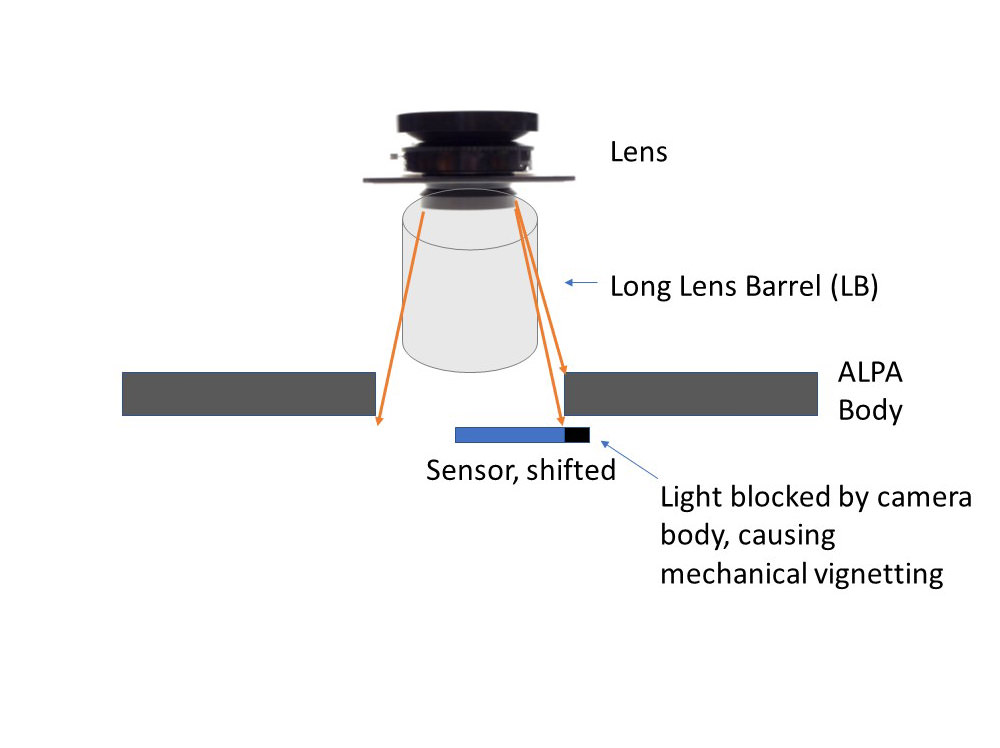
With a LB lens, when sensor is shifted, the camera body may block light, causing vignetting.
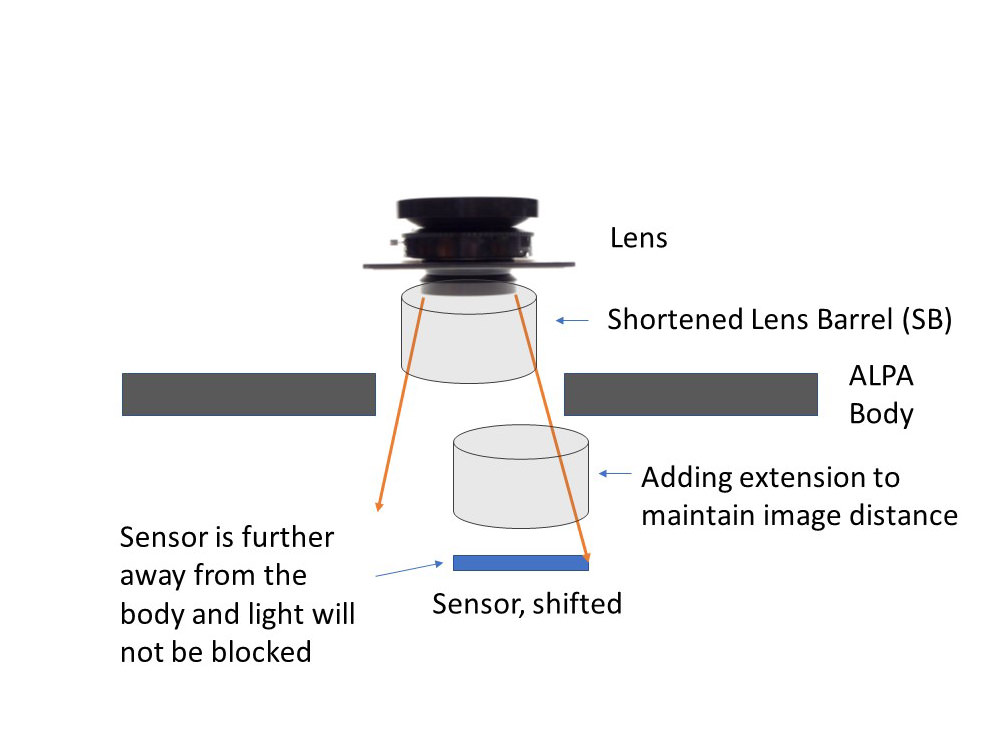
With a SB lens and an extension, the sensor is further away from the body. The body now will not block the light path, eliminating the vignetting.
The extension tubes (ALPA call them adapters) come with two flavors: fixed adapters and tilt/swing adapters. A fixed adapter is nothing but a (ridiculously expensive) square metal tube. Tilt/swing adapters come with a forward tilting mechanism so users can tilt the lens. The camera itself provides only shift movements. The tilt/swing movements are implemented with these adaptors. This is different from Cambo systems, in which each lens has built-in axis-tilt capabilities. It is also different from the in-camera axis-tilt function of Arca Swiss cameras. If you are not comfortable with tilting movements (quite a learning curve indeed), you can choose the less-expensive-and-more-robust fixed adapters.
As discussed, originally, these adaptors were meant to be installed between the camera body and the digital back to reduce vignetting. This is still true for long lenses (e.g., HR 180 on most systems, and HR 90 on 12 Pano.) However, ALPA has shortened most of wide-angle lenses as well. Mechanical vignetting is less an issue with these lenses unless you shift to extreme positions. In fact you will probably see optical vignetting of the lens first. The purpose of these adaptors on wide-angle lenses is for tilting, because neither the lens nor the ALPA body can tilt.
When using a wide-focal lens, most users mount the adaptor between the lens and the body - it is much easier to tilt this way. If the lens has a protruding back element (e.g., HR 32 and HR 50), please do mount the tube this way! Otherwise the protruding part will be stuck in the opening window of the camera body, limiting the movement. If you don't understand what I am talking about, give it a try and you shall immediately see the reason. You might also run into the risk of damaging your super expensive sensor, if the back of the lens touches the sensor surface by accident.
Note that these tilt/swing adaptors perform front-base tilt (tilted about an axis near base of the adaptor) instead of front axis tilt (tilt about a horizontal axis through the center of the lens). As you tilt the lens forward, you also extend the distance between the lens and the sensor, therefore changing the focal point. As a result, you might have to go back and forth a few iterations when you tilt and focus. Perhaps the easiest way is to fix the tilting angle first, according to the height of the camera from the ground (you can use tables, which I shall provide soon, or use a DOF calculator such as Lumariver) , then focus. The problem with this method is that the tilting angle marks on the adaptor are too tiny for old eyes like mine. A friend of mine has developed a method: with a simple experiment, he can find out how much degree it will tilt for each twist of the knob by his hand, and he remember the value. The value will be different from person to person, so you need find it by yourself.
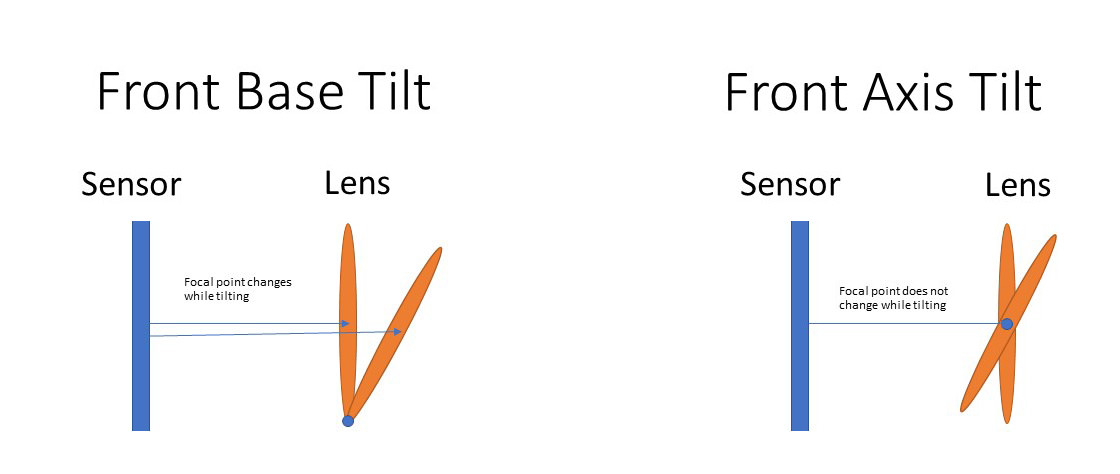
Front Base Tilt vs Front Axis Tilt.
I use a 17mm ALPA tilt/swing adapter (0° - 5°), which is always mounted on the HR32 SB17 lens. I also use a 34mm ALPA tilt/swing adapter (0° - 5°) for my HR 50mm/90mm/180mm SB34 lenses. I used to use a 17mm ALPA tilt/swing adapter and a 17mm fixed adaptor. If I need an adaptor of 34mm, I stack the two together. However, after using such a solution for a year or two, I gave up. There was just too much trouble involved. First, I had to take the 17mm adapter off the HR32. Later, I had to take the stacked ones apart and put the 17mm adapter back to HR32. When light conditions change quickly, this was a sure way to miss a shot or two.
Be gentle with these adapters. They look indestructible but are not. Last year I found that certain images taken with my HR 32mm lens were not razor sharp. Some areas of these images were sharp, and some were not. My ALPA rep, the late Fred Zhou, who was super knowledgeable, and I did some testing and we found that my 17mm adapter was deformed. I had to buy a new one (I had an upcoming project and needed one ASAP), and sent the defected adapter back to ALPA for repairs.
Other ALPA Cameras
There are a few other ALPA models which are still in production. 12 TC is the smallest and the lightest. It is just a metal frame with no shifting capability at all. IMHO, the reason we landscape photographers choose a technical camera is that it can shift and tilt. I will pass 12 TC. It can be a good camera for other purposes. 12 SWA looks beautiful. However, it can only shift upwards in the default position, again not a camera designed for landscape photography. 12 Pano is the latest addition to the ALPA family. This is a highly specialized tool, designed to do 617-format panoramas or multirow stitching. As a general-purpose camera, it is too heavy and bulky, with other limitations. In addition, there are only 50 copies been made.
PhaseOne XT (21.6 oz / 612 grams)
Note: I don't own an XT. However I have a lot of experience with the system. I have been asked countless times about my opinions of this camera. My student and business partner,
Ms. Hong Zuo, is a PhaseOne XT ambassador and a Phase One Field Professor. In the past few months she has been using XT extensively. I witnessed and got chances to work with the system many times during our photo tours. Since XT is very different from other MF products on the market, I will try to provide more in depth opinions and analysis.
While modern digital backs employ some of the most advanced electronic designs known to humankind,
the technical cameras themselves seem stuck in a traditional state not much different from the state they were in 100 years ago,
where everything was manually controlled. For seasoned users, the manual controls are simple and intuitive - I love them.
However, many people are accustomed to the automatic operations of modern cameras.
For those who have never tried a technical camera before, it can be a major psychological challenge for them to buy into such systems.
The new PhaseOne XT is an excellent camera with some limited automation (finally!).
You must use an IQ4 150 since almost all functions are controlled by the new digital back.
- Shutter:
-
The X shutter in each lens is a very lightweight, super reliable (tested to 500000+ captures),
electromagnetic leaf shutter, ranging from 1 second to 1/1000th exposure times, with full strobe sync throughout the range.
Exposures longer than 1 second can be handled in Bulb mode with the X-Shutter, or alternatively with the electronic shutter on the IQ4 150.
You can control the shutter with the blue shutter button on the camera, just like on a traditional 35mm camera. The best part is that the shutter is powered and controlled by IQ4 150, so no separate shutter control unit or battery is needed.
Shutters in other MF technical cameras such as ALPA face a major problem. The traditional Copal mechanical shutter on each lens is notoriously unreliable and breaks easily. Moreover, mechanical shutters are not being manufactured anymore. All the new ALPA lenses now are in aperture only version - called the Rodenstock Aperture Mount, with no shutter installed.
Unlike all 35mm cameras or automatic medium format cameras (e.g., PhaseOne XF, fuji GFX, or Hasselblad), there is no shutter inside the camera body. Remember the technical cameras are just some metal frames. As a result, your only option is to rely on the electronic shutter function of the digital back.
As a landscape photographer, I use electronic shutter 100% of the time (even when I shoot ocean waves) and I don't have any issue with it. I have not used mechanical shutters for years. Electronic shutters are completely vibration free, and enable important innovations such as DualExposure+. On the other hand, electronic shutters are well-known to cause rolling shutter effects on moving objects. Flash sycn speed is extremely slow (like 0.3 secs). There are also banding issues under artificial lights (such as fluorescent lights). If you shoot moving subjects, or use flash for portrait work or for light-painting landscapes, or you shoot architecture or interiors illuminated with artificial lights, then you cannot use electronic shutters. The electromagnetic shutter is a must.
On ALPA and other systems, there are a few lenses that come with other ad-hoc electromagnetic shutters (e.g., Sinar eShutter250). ALPA lists them as discontinued, but some shops still sell them. You have to use an external shutter control unit to power them and control them. To say it is cumbersome and inelegant is an understatement.
This image (from ALPA website) shows an ALPA's SILEX MK II control unit on an ALPA camera and a lens equipped with a Sinar eShutter. The control unit is needed to power up and control the Sinar eShutter e125 and e250 on some lenses. While it might be OK in a studio, this is too cumbersome to use in the field. Phase One promises to open the X shutter technology to other vendors, and we hope to see this in future. X shutter is controlled directly by IQ4 150. As a result, in future, you just need a cable to connect IQ4 150 to any non-Phase One XT lenses with X shutters. No external controller is needed. Of course, you do not even need a cable for the native XT lenses, thanks to the built-in electronic contacts.
- Aperture:
-
You can also control the aperture of the lens using a button on the digital back. In fact you can also control the aperture of XT remotely via Capture One, should such a need arise. 35mm camera users may wonder what all the fuss is about - controlling aperture via a dial or button on the body is a guarantee, right? However, please remember that on other systems such as ALPA, you must manually adjust the mechanical aperture ring, then you manually enter the actual aperture number used into the digital back. The number entered will not affect your images in any way. The system can never detect or verify the actual value. It just records whatever you have entered, in the EXIF field of the image. If you don't enter the number, the image still comes out perfectly fine (assuming you know your exposure, and I know you do), but you will not see or know the shooting aperture later when you open your files in post-processing software.
This is too much trouble, so many people skip the recording step. However Capture One can use the recorded aperture number to perform diffraction compensation, so I always recommend not to skip this. XT will know and record the shooting aperture in each image.
With XT, MF technical cameras finally enter the era of modern civilization.
- Shift:
-
XT weighs about the same as an ALPA STC, but shifts in 4 directions for 12 mm, which is amazing. All the movements are geared and do not slide. The geared movements are much faster than the ones in ALPA cameras (with less precision, of course). On an ALPA, when you turn the dial, the lens or back barely moves. This offers extremely high precision, but you want to switch to sliding for speed.
There is a trade-off here: I think that XT's choice is reasonable. The precision of the fast geared movements is more than adequate for landscape work.
On the other hand, many users, myself included, think that 12mm shift movements are not enough for panorama stitching. To me, this is the biggest problem with XT now. It prevents many people from choosing the otherwise fine camera.
The lens mount comes with electronic contacts, so the digital back will know and record shifting positions, as well as the model of lens. Automatic LCC can then be automatically applied by Capture One. Since the software knows the amount of shifting and the lens model, it can look up some built-in data to correct the vignette and color cast. In theory it will save you huge amount of time and avoid the major headache of doing LCC on location.
In reality, on IQ4 150 I never do LCC on location. Color cast is not a major issue. I have some pre-recorded LCC files (e.g., HR32 no-shift, HR32-shift-left-18mm, etc) saved in Capture One, and I will apply them in Capture One with just two mouse clicks if I have to. What about shifting positions? ALPA does not save them. I can never remember them. However, for small amounts of shifting, the vignette is minor and it can be easily fixed in Capture One without an LCC, at least most of the time. When you have to shift a lot (for stitching panoramas), you do encounter some significant vignette for certain lenses. However, I never shift halfway. To make things simple and to keep my sanity, I always shift the full amount (18 mm in ALPA STC). I might see lens vignette or even dark circles, since 18mm will exceed image circles of some lenses. However, no worry, I can always crop it out in post after stitching.
Of course, if you rise/fall and shift at the same time, things will be more complicated. However even without LCC, mitigating vignette in post is pretty easy. In summary, it is a very nice feature and I really really want to have it on my cameras. However the benefit is not earth-shattering, at least for landscape shooters.
- Tilt:
-
XT and the native XT lenses do not tilt. The stated reason is that Phase One wants to make a completely "idiot-proof" tech camera (not in these words though. Their customers are VIPs and certainly not idiots!). Introduce the tilt function to the uninitiated, and there is a decent chance that the image will come out blurred. However, I suspect that the real reason is probably based on the fact that it is much harder to sense and record tilting angles. If you are a technical camera purist, this lack of tilt function may bother you. However, in reality, you can use focus-stacking to mitigate the problem (and do a better job, with much more time spent in post processing of course). Remember tilting cannot cure all your depth-of-field problems. Even on a camera with the tilting function, you often still need to use DOF blending. On the other hand, when you have a beautiful field of flowers in your foreground, and the flowers are dancing in the wind, focus stacking becomes a nightmare or simply impossible. You probably will really miss the tilt movement.
You can use Cambo lenses (many of them come with built-in tilt mechanisms) on XT, so it is not entirely impossible to tilt. Of course you lose many new features by using these legacy lenses.
- Back Rotation and Others:
-
Similar to a Cambo WTS, you can rotate the digital back between horizontal and vertical positions without having to taking off the digital back first. As stated before, I really wish to do so on my ALPA cameras.
The long-term precision of the camera remains to be seen, although we probably should not worry too much about it, as XT is made by Cambo.
I have heard people complaining that infinity focus calibration may vary slightly, but I will have to investigate more on this issue.
- Conclusion:
-
If you are just starting to "fall into the inferno of medium format systems", you should seriously consider the XT a viable option. It has many advanced features that show us what the future of technical cameras could look like. Each improvement looks like just a small step in the right direction, and when added together, represent something big.
However, the 12mm shift is a major limitation and can be a deal-breaker. I hope that there will be a XT+ version in the future that shifts 18-20mm horizontally. If wide-format panoramas are not your thing, then obviously the current incarnation of XT should not be an issue. If you love using tilt movements then XT is not for you.
If you already own another nice brand such as ALPA, then there is no compelling reason to switch, at least for now. Once you are used to the ritual of a technical camera, (after the initial struggling for weeks or months) you have muscle memory for all the movements and more importantly the workflow. At this point, most of the new functions (e.g., controlling aperture on the digital back or recording the amount of shifting) are nice but not essential. In fact, at this point, many of us will actually enjoy the "simplicity" of a pure mechanical camera. We have presumably forgotten all of the initial learning curve, and sometimes automatically assume that every person in the world can learn how to use our favorite camera in a few minutes. (Spoiler alert: it is not that easy!) Should someone dare to disagree, we could spend days on the internet forums or discussion groups arguing with that idiot.
Don’t get me wrong. All these automations are nice features and absolutely point to the right direction. Tech camera newbies will highly appreciate them, as they don't have to struggle as much in the beginning as most of us did. I am merely saying that the new features are not significant enough to convince most EXISTING tech camera photographers to switch systems. It is mostly boiled down to money, if I am allowed to put it bluntly, although I do agree that there will always be a large number of people willing to choose a more traditional camera for various other reasons, including functionality and aesthetic ones. The cost of switching is really high. You need to buy all the lenses and the camera again. Of course, if you have serious money burning a hole in your pocket, sure you should try this new toy. It is one of the best cameras and you deserve the best. I have some friends who own ALPA and XT and Rolls-Royces and other fine things in life. If you can, you should do the same.